
Our Boothing Common Difficulties
In my booth, we usually work in groups of 4-5 individual artist brands, so each person keeps their own share but the wallet is shared for ease of convenience for payment in the day, since shoppers usually buy a mix of artists’ items. So it is important to keep track accurately of each sales to make sure each artist gets the right amount of income at the end of event.
We used to do mostly manual tally, with just writing down on a piece of paper of each sale made and a list of items each artist owns. It’s simple and supposedly fine, but in the end of a chaotic convention day we always end up missing or forgetting things – was this order marked down? Did the person pay already? We tried listing items per order too, but that took too much time for bigger list of items.
Our concerns during artist alley:
- Each artist owns a lot of items, the price varies and there are sometimes bundles and promo discounts. Sometimes one artist is not too familiar with the fandom works and promo made by another artist so we need a way to find reference quickly of how much and what an item looks like.
- During a tiring day, we become tired and slow at remembering things or even calculating basic math lol – we need a way to quickly count how much a customer should pay without memorizing all item prices manually.
- Unstable internet connection in venue – so the tool must be still accessible without internet.
- Sometimes an artist will go around or leave the booth, so the tool cannot be tied to just one person’s device.
- Crowd issue during the event, so it feels unsafe to have a separate tablet or device just for cashier and in our case too, we do not have a spare device to be used for share.
- We need to find a way to quickly calculate how much each artist earns at the end of the event. We will still cross check with our stock inventory, but the process should be as smooth as possible.
How Boother Works:
Disclaimer: Written as of early November 2026, the app is very frequently updated and adjusted so it may not be accurate at time of you reading -but this should give you some ideas what features you can get!
Data Entry
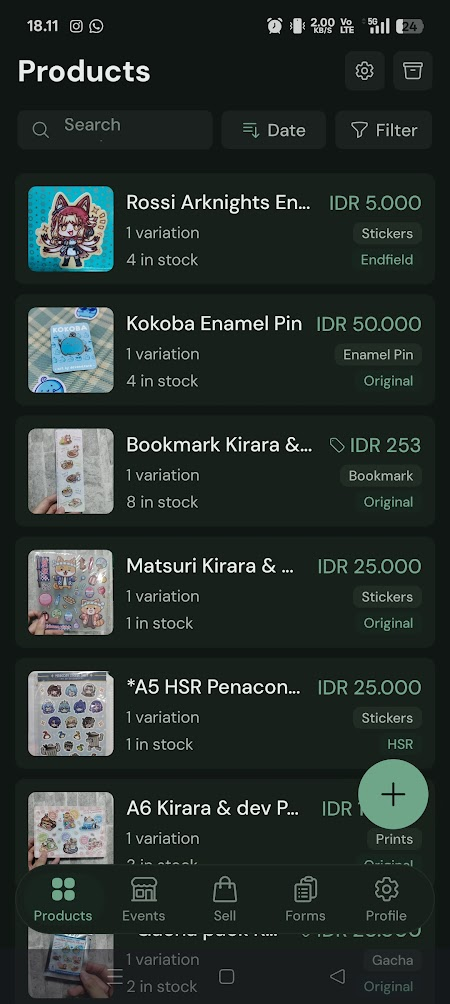
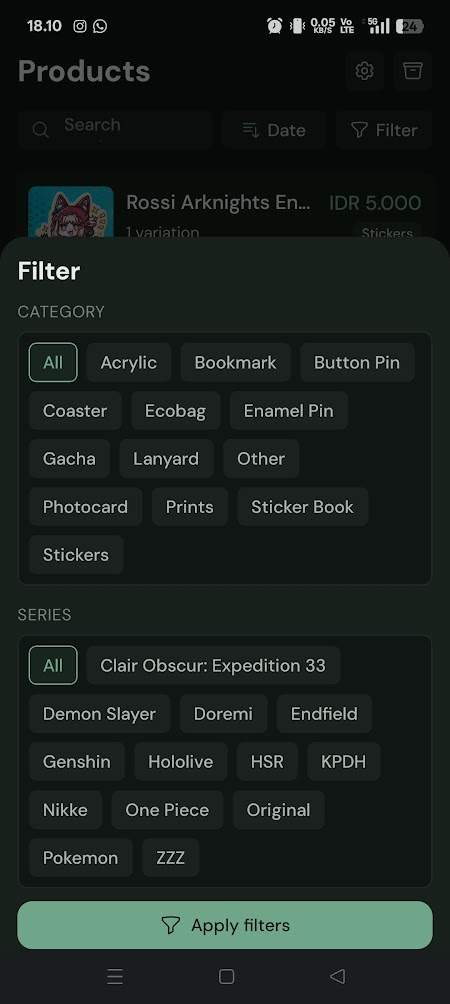
The concept: Each artist prepares their own list of products. These items can be used repeatedly on multiple events, so no need to worry to reinput or duplicate every time. Just choose which items you want to bring to that event and which ones that will be put away from the cashier view during the day.
You can assign category, series, variations, and insert photo to make it easier to identify. You can choose to keep track of stock so items are reduced when sold and you know how many are left, or not to track it. Currently each item can be multiple ‘category’, but can only be one ‘series’, so tag them accordingly.
The items can be filtered by artist depending on the user who uploads the item, so you don’t need to add a tag for artist name – unless the people who are uploading the items do not always match who owns each of the items.
Personal Tip: When having multiple people in one booth, decide on a list of categories and series to make it uniform.
This way so you will not have similar spellings of the same thing like ‘sticker’, ‘stickers’, ‘stiker’ showing as different categories, or ‘HSR’ and ‘Honkai Star Rail’ both appearing that can cause confusion.
The search feature is very handy that it includes product name, series, and variation – so you can make use of it to include as much alternate spellings or names for a product that someone may type in to find quickly, like ‘Demon Slayer’, ‘KNY’, ‘Kimetsu no Yaiba’, and so on. You’ll most likely hurry on the event day so you gotta make sure you can find items easily! Personally I use the search bar more than the category tabs, but filters help too.
Stock Inventory
You can have stock inventory in the app and update it on the go. Item owners can change stock items quantity on the day (for example, you accidentally found extra batch of goods you forgot to input counting on the event). Items are automatically deducted when a sale is made. You can also choose not to track stock if it’s a hassle, but personally I find it useful so we know how much stock is left of any item anytime (like, we know when to stop looking in the luggage when we saw the item is 0 stock lmao)
However, naturally if you want to do stock tracking in the app, make sure everyone counts each item stock properly before the event, and make sure everyone agrees on the same thing. For example, can the display item be sold? Does it count to the stock listed in the app? Are bonus bundle items allowed to be sold separately? Are bonus items optional or need extra steps like having to follow social media of the artist? and so on. Sometimes it may come as obvious but each artist may have their own habits and promotion rules!
Bundles vs Combos
This part is very useful if you have some promo deals, and a feature that may be missing or not obvious to set up in most cashier apps. The terms sound similar so it confused me a bit, so here is a quick comparison.
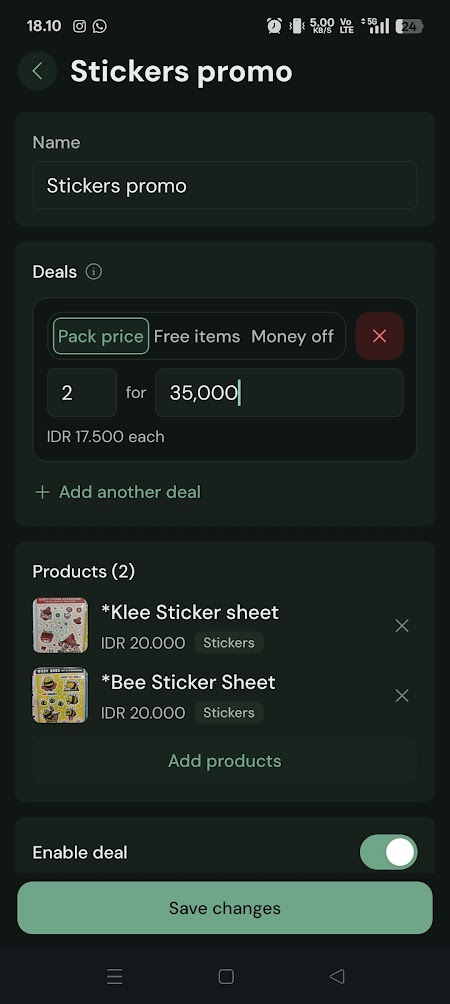
BUNDLE DEALS USE SCENARIO:
Buy X amount of (any of listed items in this deal), get X amount of free item from the same selection of products. Buy 1 Get 1 stuff goes here.
Buy X amount of items, price will become certain amount or discounted specific number (no percentage at the moment).
So for example: Buy 1 sticker sheet, get 1 free sticker sheet. You can add multiple sticker sheet products that is eligible for this promo, or only specific few ones.
Other examples: Buy 5 keychains, get 10,000 discount (but can’t input buy 5 get 20% off), or buy 2 stickers for 8,000 while individual sticker is 5,000.
COMBO SCENARIO:
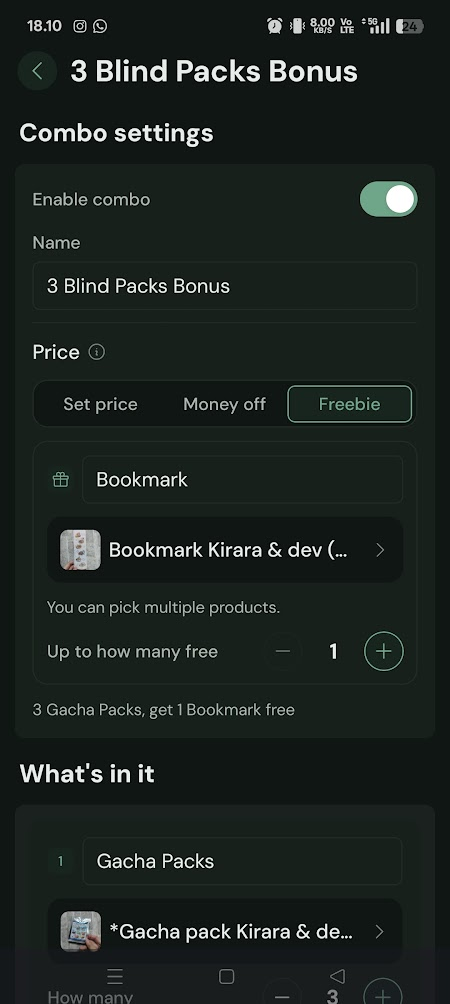
Buy (certain number of items in the list), get freebie (can select multiple products eligible as freebie, but decide how many max freebie item per promo). I think the freebie bonus part is very useful since I often give out extra bonus items for specific items combo!
Make a ‘combo pack’ with specific price or discount that consists specific amount of specific items you chose. For example, Childe enjoyer pack that consists of 1 Childe keychain, 5 Childe stickers and 1 Childe photocard for a set promo price.
For example: get 3 specific keychains for 50k, or get 15k off for buying 2 bags. There is no ‘OR’ option like in deals where it’s more like (if you buy any 2 items from this list, then this bundle applies), unless you use product variations then it can be similar.
Note: you can only make bundles and deals based on your own products that you make yourself at the moment, so you can’t mix and match with someone else’s items yet, but I heard it’s going to be updated soon.
Excel entry
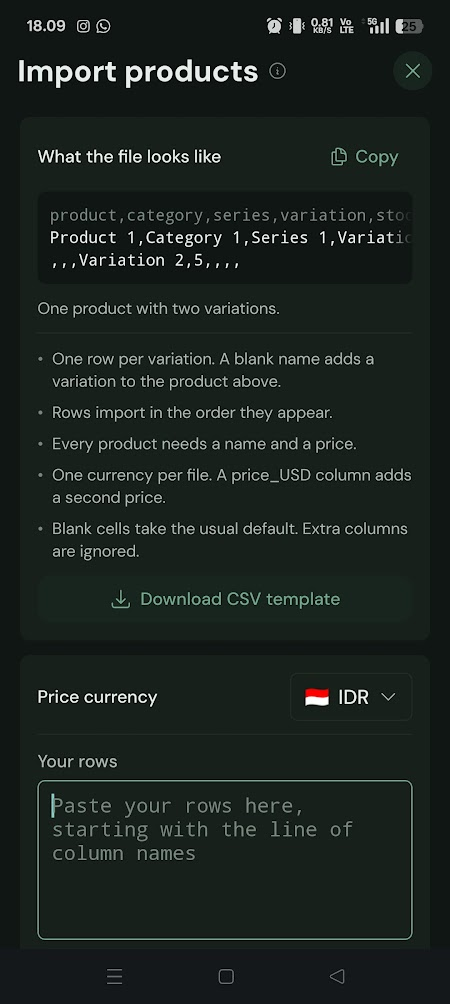
You can use CSV file to simplify inputting a lot of products. There is no web or desktop app version at the time of writing (though I heard it is planned), so you have to use the mobile app to import or copy paste it.
How to import products: Go to Products > click Settings on gear icon > Import products > import or copy paste the CSV file.
Personally I think this is the easiest method for first time entry of products if you have a lot of items, then later you can add and edit info manually in the app.
At the time of writing, pictures for each variation have to set via the app after products are made.
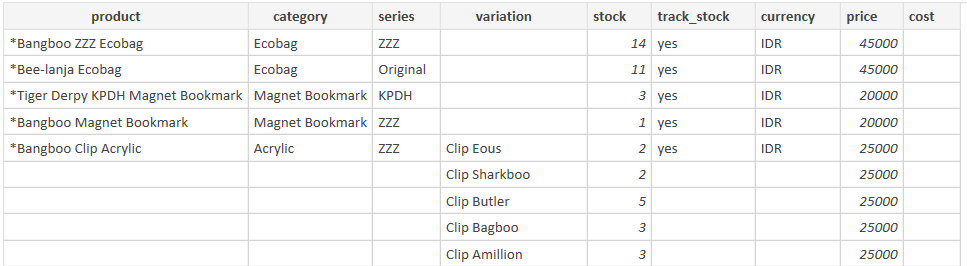
In Excel, you can just make the list of products data following the provided template, then export as CSV (Comma delimited).
When opening CSV file in Excel, if the file only displays single long lines with commas that is hard to read, you can click Data tab > select ‘From Text/CSV’ to import the file to show as a table. 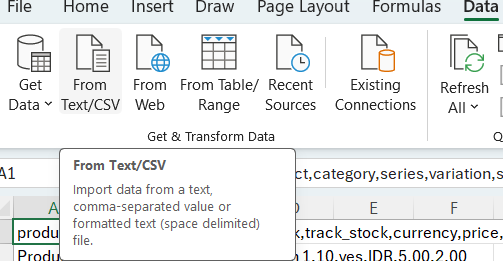
This is how a CSV looks like in table form. Once you save it again, remember to save it as CSV format so it can be readable by Boother.
Event System
Once the items are ready, you can create an ‘Event’ then assign members who will be attending, then choose which products you will bring to that event.
This makes it easier for us since in our case, each event may have different people joining and they may bring different items each time, or when you are preparing for multiple events in close dates.
At the time of writing, if the booth owner is Premium paid user, then other users can access the premium features for the events they got invited to by the premium user. You can invite using a random set of letters code generated for each event made.
I think this is what makes the app suitable for artist alleys since it allows clear cut off for earnings for different event schedules, while other traditional POS or cashier apps is typically made for continuous daily use of sales. You can easily find and compare data per event you attended like insights on which items sold the most per event, earnings per member, unsold items in specific event, sales log with timestamp, etc.
Personal tip: If you made a mistake when making a sale, you can ‘cancel’ it by making the sales ‘void’ so it won’t count to the total sales and will not reduce the stock.
Currently as far as I know only an admin can do it, so make sure the right people have the void order feature access so you will not end up with mismatched sales or stock tracking.
Payment Method
The app supports multiple currencies (useful if you sell the same item in multiple countries) and while it does not support specific payment method integrations (like connect to PayPal 0r credit card stuff), you can still add multiple payment methods option to keep track of how each sale is made. You can also give special discounts and price adjustments for specific orders on the go (for stuff like friend special price discount or things like that, haha).
For each payment type, you can upload an image manually then set it to show that image when choosing to pay it, so you can use this for QR code. You can also add text notes like bank transfer info.
So if you do individual payment to each artist type, each artist can put their own QR/bank info and choose which info to display when selling.
Finances & Earnings
In the end of the event, the app will calculate the earnings of each artist. You can see the earnings of each person, top sold items, and even a chart of a friendly competition ranking to see who made the most sales checkout during the event.
You can also input expenses to deduct to amount of earnings and get a more accurate result.
Conveniently you can export the whole sales log to Excel file, so if you need to crosscheck specific sales and filter things out for data, you can do that as well.
Some insights are locked with the Premium subscription, and I think it’s worth getting if you want to see more summaries of your product sales to see what sells good and what needs more push.
Order Form
Honestly I have not tried much on this feature since I already use Jotform and Google Form before for my order form, but this looks neat and I have heard good things about it. I will update this section more when I get to experiment more with it!
Summary
We gave it a run during Comifuro which is our most hectic event of the year with a group of 5 artists – so we used the Premium version. It works well! It’s legit the first time our earnings summarizing process work out so smoothly while usually it can get very lengthy and a hassle to count and crosscheck.
I recommend practicing the app before the actual day and try out different scenarios, especially if you do a variety of sales promo and bundles to make sure the options show up and counts properly. While the app is pretty easy to use, sometimes you need to get used where to find things and the fastest way to find items on the go.
Also do note that sometimes it takes awhile to sync between members for items list or promo bundles as it depends on the internet to sync, so make sure it’s all there for everyone before the event starts, and prepare early to input things! Transactions and changes will be saved offline in your app until you get internet connection to sync it with the others, so even when internet is unstable you can still access the app and input data.
I also greatly recommend joining the app’s Discord server to get the latest updates and answers for common questions, as the developer has been greatly supportive and responsive to community feedback.
For fellow artist alley creators, what method do you use to keep track of your sale on the booth? I’m interested to know more of how other booths are doing it and wondering how to make things more efficient onsite, and to hear your experiences using the app!

